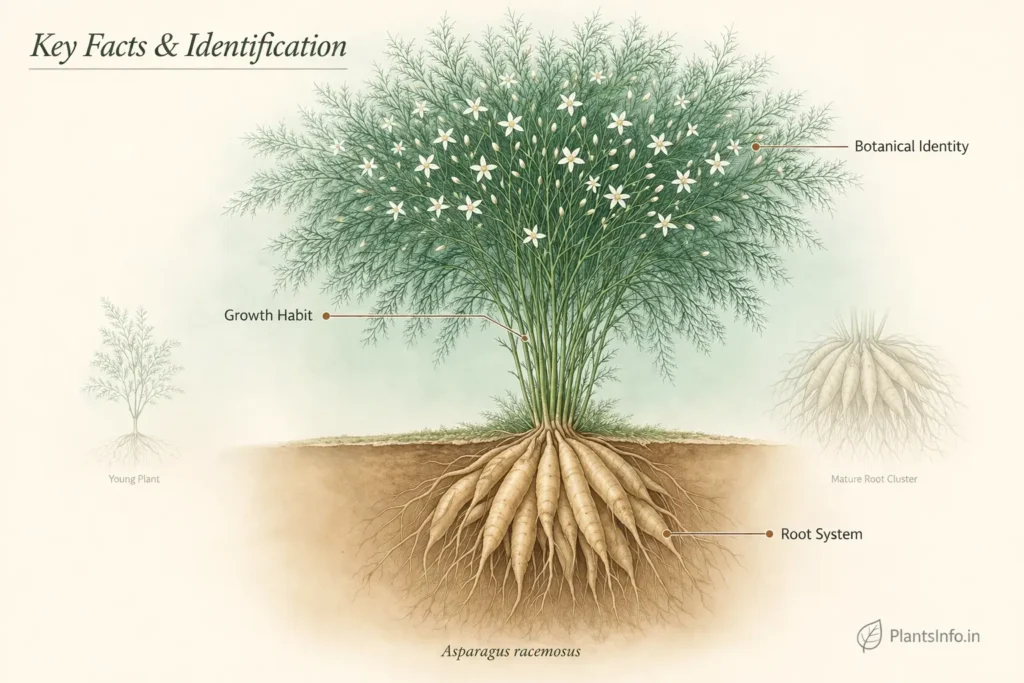
Shatavari Plant Problems: Symptoms, Causes and Fixes

Shatavari Plant Problems: Symptoms, Causes, and Fixes
Quick Answer: Root rot from waterlogging during the monsoon is the single most common — and most preventable — cause of Shatavari failure in Indian gardens. Most other problems, including pest damage and yellowing, are minor if caught early. A healthy plant in well-drained soil is genuinely difficult to lose.
See also: Shatavari plant profile, how to grow it, its flowering season, its benefits, and its varieties.
Most Shatavari problems announce themselves gradually. The plant gives visible warning signs days or weeks before significant damage is done — and most of those signs are caused by the same thing: too much water sitting around the roots. Knowing the difference between a recoverable problem and an unrecoverable one saves both time and money.
Recommended Products
Disclosure: As an Amazon Associate, PlantsInfo may earn from qualifying purchases.
🌱 Growing Essentials
The following products can help with container gardening, potting, root development, soil management, and healthy plant growth.
Organic Potting Soil Mix
Provides nutrients, structure, and healthy growing conditions for container plants.
Coco Peat Growing Medium
Enhances moisture retention while maintaining excellent root-zone aeration.

Grow Bags for Plants
Improve drainage, root aeration, and vegetable production in limited spaces.

Plastic Pots for Plants
Ideal containers for seedlings, ornamentals, herbs, and balcony gardens.
Quick Diagnosis
| Symptom | Most Likely Cause | First Action |
|---|---|---|
| Yellowing cladodes from stem base upward | Overwatering or root rot | Reduce water; check root zone |
| Yellowing cladodes from the stem base upward | Nutrient deficiency or sun shortage | Apply vermicompost; reposition |
| Cladodes dropping in April–May | Normal summer semi-dormancy | No action needed |
| Fine webbing on stems; pale stippled cladodes | Spider mites | Spray neem oil solution |
| White cottony patches at stem nodes | Mealybug infestation | Remove manually; apply neem oil |
| Wilting despite moist soil | Root rot or crown rot | Check the undersides of new growth |
| Stunted new growth; distorted shoots | Aphid infestation or nutrient imbalance | Insufficient sun during the growth phase |
| No flowering by year three | Insufficient sun during growth phase | Reposition or improve sun exposure |
Diseases
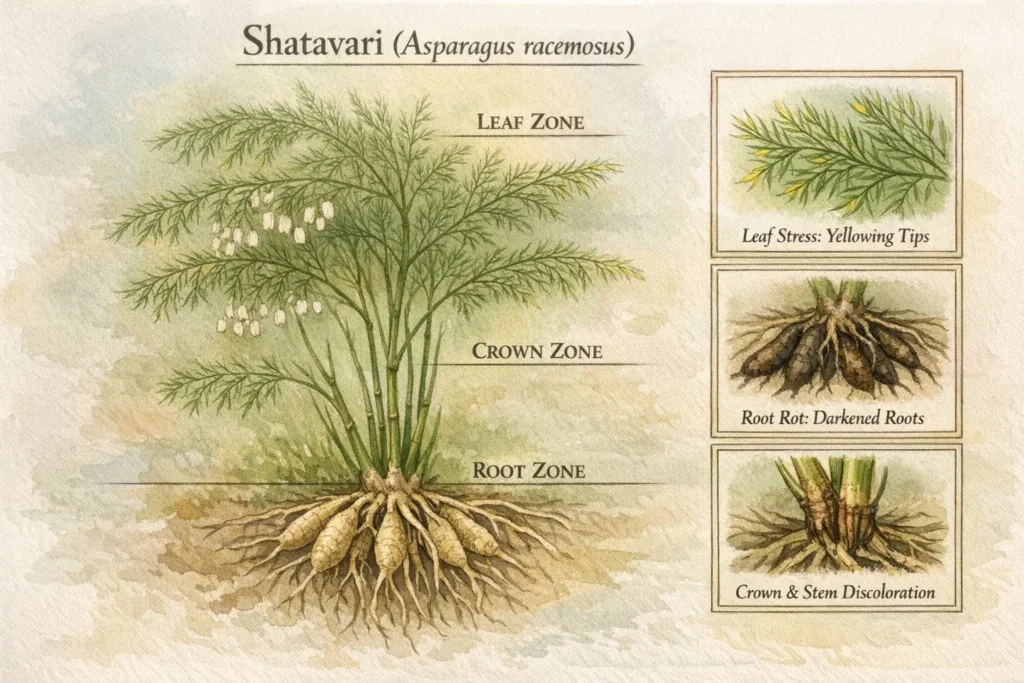
Root rot (Fusarium or Pythium species) is the most significant disease threat to Shatavari in Indian conditions. It appears as a sudden wilting that does not respond to watering, followed by softening and browning of the root tubers when examined. The causal fungi thrive in waterlogged, poorly aerated soil — the monsoon season is the highest-risk period. Mild cases where only some roots are affected can be managed by improving drainage, removing affected root material, and drenching the remaining root zone with a diluted copper oxychloride solution. Severe root rot involving most of the root cluster is not recoverable.
Prevention: Ensure drainage before the monsoon begins. This is the single most effective step.
Stem blight (fungal) appears as brown to dark lesions on stems that spread and cause stem sections to die back. It is more common in humid coastal conditions and in densely planted situations with poor air circulation. Affected stems should be pruned cleanly at healthy tissue, and the cuts treated with a copper-based paste. Sterilise pruning tools between cuts.
Viral yellowing occasionally occurs and presents as irregular mottled or mosaic yellowing that does not follow the nutritional pattern (uniform, progressive) or the overwatering pattern (basal). Viral disease in Shatavari has no cure — affected plants should be removed and destroyed, not composted. Do not replant in the same soil for at least one season.
Pest Problems
Spider mites are the most common pest on Shatavari, particularly during the dry pre-monsoon months (March–May) when hot, dusty conditions favour rapid mite multiplication. The identifying sign is fine, dusty webbing across the feathery cladodes, accompanied by a stippled, pale appearance as mites feed on plant tissue. Organically, a strong spray of water dislodges mites effectively when applied consistently over 5–7 days. For heavier infestations, a neem oil spray (5 ml neem oil + 1 ml liquid soap per litre of water) applied in the evening on consecutive days is effective.
Mealybugs appear as white cottony masses at stem nodes and where stems meet the trellis. They are easily mistaken for fungal growth by first-time growers. Remove visible colonies with a cotton swab dipped in rubbing alcohol, then follow with a neem oil spray. Ants around the base of the plant are a secondary indicator — they farm mealybugs for honeydew, and their presence warrants a closer inspection of the stems.
Aphids cluster on new growth — the soft, unfurling cladodes at stem tips — and cause distorted, curled new shoots. A hand-spray of water or diluted neem oil solution manages small infestations effectively. Severe aphid pressure may require a systemic contact insecticide such as imidacloprid, applied strictly per label instructions and not during the flowering period to protect pollinators.
This information is for general guidance only. Always read product labels before applying any pesticide or fungicide. Follow state agriculture department guidelines for food crops. Keep children and pets away during and after application.
Environmental and Care Mistakes
Overwatering is the most common mistake among first-time Shatavari growers. The plant’s feathery, moisture-loving appearance leads to over-irrigation — but its roots evolved in semi-arid conditions and are far more drought-tolerant than the aerial growth suggests. Symptom: basal yellowing of cladodes with soft, discoloured stem tissue at the soil level. Fix: withhold water entirely until the top 5 cm of soil is completely dry, then resume a reduced schedule. See the Growing Guide for correct watering frequency.
Shallow containers stunt root development visibly — the plant grows normally above ground for the first year, then slows, stops flowering, and eventually declines. Symptom: roots circling at the base of the pot and emerging from drainage holes within 18 months. Fix: repot into a container of at least 45 cm depth at the start of the pre-monsoon season.
Trellis removal or stem disturbance during active growth causes significant stress and can trigger cladode drop and stem dieback. If the plant needs to be moved, do so in February–March during the post-root-harvest window, before the new growth season begins.
Summer dieback misdiagnosis is perhaps the most anxiety-inducing non-problem in Shatavari growing. When cladodes drop en masse in April–May during peak heat, most first-time growers conclude the plant is dying. It is not — it is entering a normal semi-dormant phase. The diagnostic test: pull one tuber slightly from the soil. If it is firm and pale yellow-white, the plant is alive and dormant. If it is soft, brown, and mushy, root rot is the actual cause.
Prevention Protocol
Good drainage is the foundation of a problem-free Shatavari plant — this means actively preparing the root zone before the monsoon arrives every year, not just at planting. Check and clear drainage holes in containers in May. In ground planting, confirm that standing water does not persist for more than 30 minutes after heavy rain.
Apply neem cake to the soil around the base at the start of the monsoon — approximately 50–100g per square metre — as both a soil amendment and a prophylactic against soil-borne fungal pathogens and some pests.
Before the dry season (October onward), increase spacing between the vine and its trellis if it has become dense. Thinning stems that cross and overlap reduces the humidity pockets that favour fungal diseases.
Inspect new growth every 10–14 days during March–May, when spider mites and aphids peak. Early detection at this stage takes a few minutes of treatment; a missed infestation in peak dry season can require weeks to manage.
When to Give Up on a Plant
If root excavation reveals that the majority of the tuber cluster is brown, soft, and malodorous, the plant cannot be saved. Remove it completely, including all root material you can reach.
Do not compost affected roots — bag and dispose of them, particularly if root rot has been severe, to prevent fungal spores from spreading in the garden.
If viral mosaic or mottle yellowing is confirmed (irregular pattern, no response to nutrition or watering correction), remove the plant immediately and dispose of it. Do not replant Shatavari in the same soil spot for at least one full season — if possible, replace the top 15–20 cm of soil or solarise it through the summer before replanting.
Frequently Asked Questions
Can I eat roots from a plant that was treated with pesticides?
Wait a minimum of 2–4 weeks after the last pesticide application before harvesting roots, and only use pesticides labelled safe for edible crops. Check the specific product label for the pre-harvest interval.
Is the yellowing after transplanting normal?
Yes — Shatavari typically drops some cladodes within 1–2 weeks of transplanting. As long as the stems remain firm and green, recovery is normal. Consistent but moderate watering during this period accelerates re-establishment.
My plant looks dead in May — is it?
Likely not. Check root firmness before concluding the plant is dead. Firm, pale tubers mean dormancy; soft, brown tubers mean rot. See the Environmental Mistakes section above for the full diagnosis.
Conclusion
Give Shatavari sharp drainage, catch pest problems early, and resist the urge to overwater — this plant’s problems are almost entirely preventable, and a well-established specimen is one of the more resilient medicinal climbers an Indian home gardener can grow.